
RGM-96X Jesta Cannon MKII H.W.S by dekar7
Thanks to the modeler for sharing “EVERYTHING”, yes you read it right, EVERYTHING! The modeler, dekar7, shared to us the complete procedure as well as the materials he used to obtain this jaw-dropping results!
From the modeler…
Description/Concept:
This build was my entry into the ‘Gundam Build Fighters Competition 2014’ by Gundam Club Australia, November 2014. The rules were restricted to any HG 1/144 kit, Builders Parts, kit bashing, custom painting, modifying parts could be used.
Competition Entry Description:
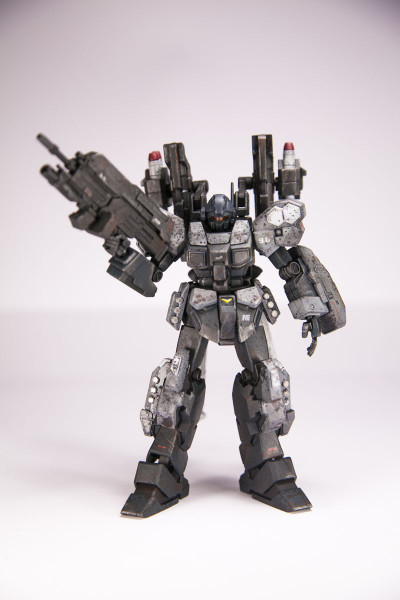
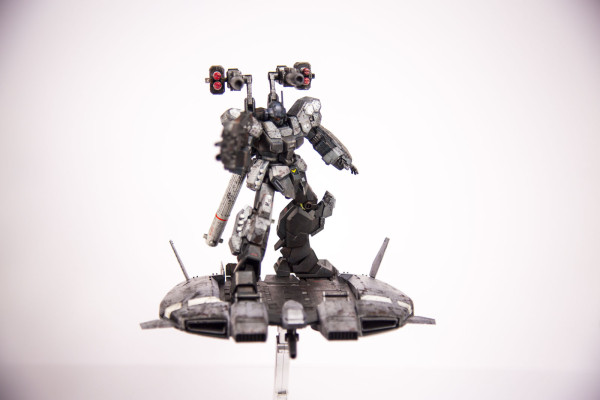
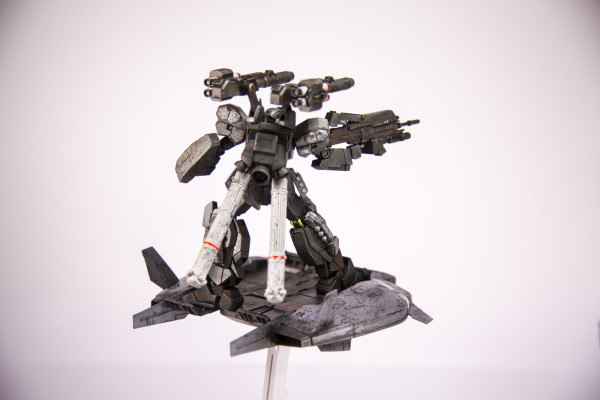
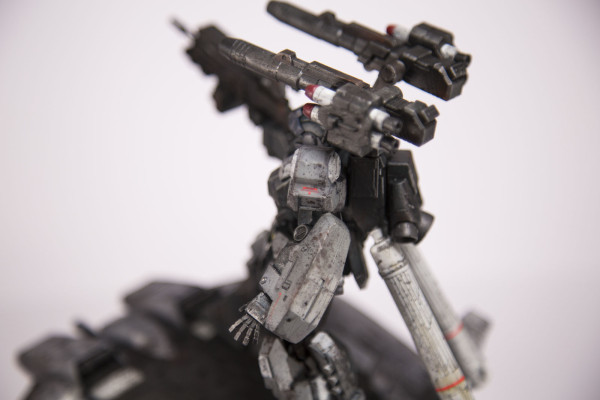
RGM-96X Jesta Cannon MKII – Heavy Weapon System with Base Jabber EFSF Sub Flight System: The Jesta Cannon MKII was created to provide long range support to the E.F.S.F defence units. The MKII is equipped with dual high velocity rockets and burst rifle. Long range fuel tanks provide the MKII with longer flight time in battle. The MKII has been in service for 28 years and has provided the E.F.S.F with many victories!
Model Description:
When planning this build I was heavily inspired by ‘heavy military’ looking machines and Gundams, a heavy armoured kit was what i had in mind. I wanted to trying, for the first time, the paint chipping and weathering techniques as though the Gundam had been in many battles, was a veteran of the fleet!

I follow a number of Instagram/Youtube modelers which provide me with heaps of inspiration and tutorials. I came across a few original Jesta kit builds and just through Googling the kit name I came across the RGM-96X Jesta Cannon – this was the perfect base kit as he has a strong ‘military grunt’ look about him. He was also a good match to use the Base Jabber, as a secondary piece to the build to work with the military theme.
I purchased a number of Badai Builders Parts to add some simple modifications – chaning the original Jesta Cannon into a more heavy weapon type. My plan was to replace the two main backpack weapons with matching canons, which could fold away, new thrusters and the addition of fuel tanks. Some small details included photo etched decals.


Paints, Parts and Tools Used:
Brand Reference:
Mr Hobby – Mr Color (MC) Lacquer based
Mr Hobby – Hobby Colour (HC) Acrylic based
Tamiya – Acrylic based (TA)
Tamiya – Enamel based (TE)
Primer/Rust Weather base paint:
- Alcad II Black Primer and Micro Filler #ALC-309
- Mixture of MC #7 Brown – HC #84 Mahogany – Applied to select areas for rust effect.
Jesta Cannon:
- Armor – TA #XF-50 Field Blue
- Armor – HC #54 Navy Blue
- Armor – HC #337 Grayish Blue FS35237
- Armor – HC #338 Light Grey FS36495
- Inner Frame – TA #XF-69 Nato Black
- Weapons – TA #XF-69 Nato Black; HC #301 Grey FS36081
- Detail – HC #33 Russet; HC #74 Sky Duck Egg Green; HC #329 Yellow FS13538; HC #92 Clear Orange
- Panel lines/Wash – TE #X-1 Black with light fluid wash
Base Jabber:
- Fuselage – HC #53 Neutral Grey; HC #338 Light Grey FS36495
- Platform – HC #301 Grey FS360821
- Thrusters – TA #XF-69 Nato Black
Weathering:
- Tamiya Weathering Master:
– Set B: Soot, Rust
– Set C: Burnt Blue, Burnt Red
– Set D: Gunmetal, Silver - Schwarzkopf Taft #4 Max Hold Hair Styling Lacquer
- Homebrand Salt – Coarse, Normal, Fine
Top Coat and Tools
- Aclad II Klear Kote – #ALC 310 – prior to decals and panel lining
- Tamiya Spray Can – #TS-80 Flat Clear – final coat
- Tamiya White Putty
- Tamiya Masking Tape
- Mr Mark Setter
- Mr Cement Deluxe
- Revell Contacta Pro Liquid Glue
Decals – minimal selection used from following sheet:
- #30 HG for EFSF
- #37 HG for EFSF
- #75 MG Victory Gundam Ver. Ka.
- Detail Metal Parts (purchased via Nobel Models on eBay) – AW016B 2mm, AW007A 2mm, AW007B 1mm
Bandai Builders Parts:
- MS Hands 01, MS Verniers 02, MS Panels, MS Cannon 01, MS Tanks 01
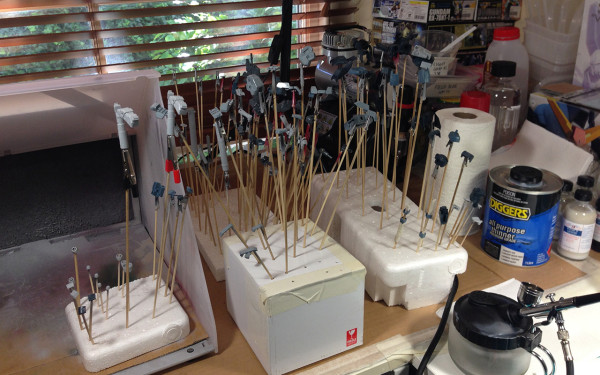
Painting & Weathering Techniques:
Modding, Battle Damage, Cast Iron Texture:
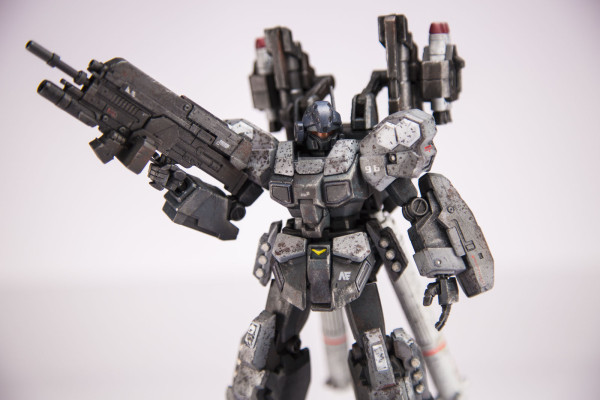
After snap fitting the kit together I went about customising the various Builders Parts (BP) – the backpack x1 large and x2 side verniers added, i replace the original x2 thrusters with modified BP fuel tanks – these ball joints were perfect snap fit into the thruster joints! I decided to removed the original canon mount in order for the new canons to fold away. The BP Canon arms were mounted into polycaps on the top of the backpack where i had removed the original kits cannon parts. To cover some of the modified areas of the backpack i used BP Panels on the sides. I tried various position for the spare rockets, on the side of the canons and on the Jestas side skirts – which looks bulky for his arms to rest so the final position worked best on the side of the canons. As a feature to the kit i wanted the canons to fold away for flight mode. I tried a number of ways to mount the canons so they could fold away without them having to be removed from the kit to transform.


To archive a weathered/realistic texture for the overall kits, I used the cast iron effect. This technique use Tamiya Cement Deluxe to melt each part, followed by brushing over with a toothbrush to leave the plastic with a rough texture, much like cast iron. It took quite bit of time to go over all pieces, the base jabber too. During this phase I hacked parts of the kit with metal files, sprue cutters, exo knife etc. to add points of battle damage. Using the cement to help melt the plastic meant it was softer an easy to manipulate to damage areas. Once dried i gave each piece a light sand.
Priming, Rust & Chipping:
To begin the rust and weathering look there were a few steps involved to achieve the final result. First step was to prime all pieces with Aclad II Black Primers. Followed by adding some spots of rust by using a mixture of #7 Brown and #84 Mahogany i applied to a select areas where rust would occur in a real life.
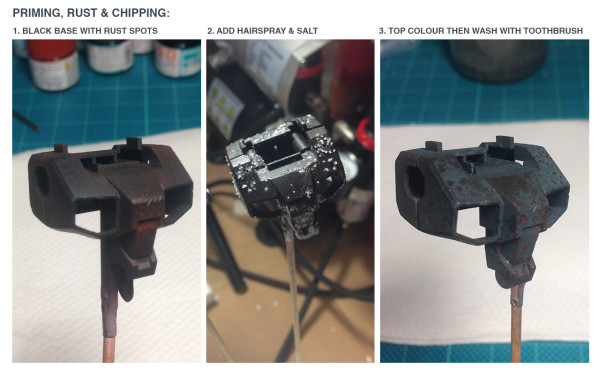
Once the primer/rust was dried I begin the process of the paint chipping effect. Each piece was sprayed with the Taft lacquer hair spray, then i used a combination of course, normal or fine grit salt sprinkled over the areas where i wanted the rust colour to be exposed. Once the hairspray dries the top paint colour paint can be applied, covering over all the salt areas too. The next step is the fun part – removing the salt to see if the chipping has worked. To removed the salt each piece was dipped in some lukewarm water then brushed with a toothbrush to remove the salt flakes. The final result is the exposed black and rust base layer through the top paint coat. A little extra scrubbing with the toothbrush certain areas helped expose more of the rust base layer.
Panel Lining, Detailed Part Masking and Painting:
Once all pieces had dried with the salt removed I protected the finish for each piece with Aclad II Klear Kote . This also helps create a smooth surface for the with panel line wash to get into all tiny areas. I used Tamiya #X-1 Black thinned with lighter fluid to darken all panel lines.

To add different colour tones to individual pieces I used Tamiya masking tape to mask off areas. Such as on the parts on the Beam Rifle, torso V emblem, light grey colours on the Base Jabber.
Decals, Weathering Pigments and Final Flat Coat:
At this stage all the airbrush painting was done. Onto all the details! First step was adding decals to highlight points of detail. The original kit only came with metallic stickers so were no use so adding water slide decals was bit of a guessing game to work out what would look good. I went with mostly white or red on dark areas and light grey on some armor pieces. Keeping the decals very minimal to stay true to a real military look. Once each decal had dried i went over dry brushing each one using a sponge tip to achieve a random worn look. Once all dried I began assembling parts of the kit to move onto weathering.
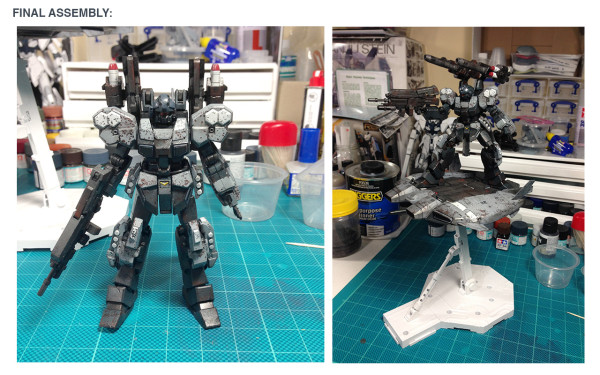
With each main section of the kit assembled I began weathering the kit with dark colours first. Areas around the thrusters on both the Jesta and Base Jabber had Soot, Burnt Blue and Gunmetal pigments applied with sponge applicator – this allows for the pigments to be smeared or dabbed on to achieve a real worn look. For the inner frame and damaged parts i used a combination of soot, silver and rust o bring out the edge details. To dull the brightness of the decals soot and rust pigments were lightly brushed over each which really helped blend the decals into each part.
Once weathering was done a final top coat using Tamiya #TS-80 Flat Clear was applied. This helps to protect the pigments, flatten the paint tone of the model.
Photography:
The final step of the build was posing and photography. Photos were shot on a Canon 5D MkIII with x3 light sources with x2 sheet of white card. Image exposure and colour balanced using Photoshop.
Final Comments:
I was pretty happy to be awarded 2nd Place for this entry in the GBF competition!
This was only my second time painting a Gundam kit and airbrushing! Thanks to the amazing modellers and YouTube videos i was able to learn these techniques. I was a little nervous doing all the battle damage to the kit to begin with. But having taken my time, watched A LOT of tutorial videos , had referenced other modellers builds, I was able to achieve this result. I encourage anyone to give it a try! I surprised myself with this kit build that giving challenging techniques a go is highly rewarding as a modeller!
More info – GBF comp results and other entry photos:
https://www.facebook.com/groups/GundamClubAustralia/
https://www.facebook.com/groups/GundamClubAustralia/photos/
Referenced videos:
Justinius Builds – Weathering 2.0 Texturing and chipping
The Ghost of Zeon – Easy Cast iron Effects, Weathering using the Hairspray Technique, Panel Line Washes with Lighter Fluid


